ProJor Quick Start
Before downloading and installing ProJor, please make sure you have read and accepted the ProJor License Agreement.
After that, you can Download & install the appropriate ProJor distribution.
Installing ProJor for VS Code
Show me how to install ProJor for VS Code
Install the ProJor VS Code Extension from Visual Studio Marketplace.
You can also go to the ProJor Downloads Page, and download the VS Code Extension manually.
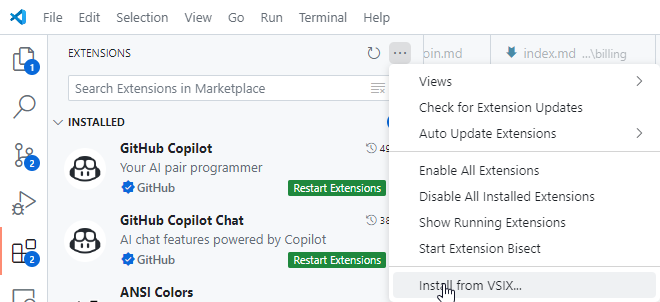
Once you have downloaded the .vsix file, open up VS Code, and navigate to the Extensions pane. Click the ... button to access further options, and select Install from VSIX. Choose the downloaded .vsix file, and click Install.
Installing ProJor CLI
Show me how to install ProJor CLI
Go to the ProJor Downloads Page, and download the CLI distribution for your operating system.
Install ProJor by placing the executable in a directory that is included in your system's PATH. Rename the binary to projor if necessary.
On Linux operating systems, you may need to use chmod +x command to make the downloaded binary executable.
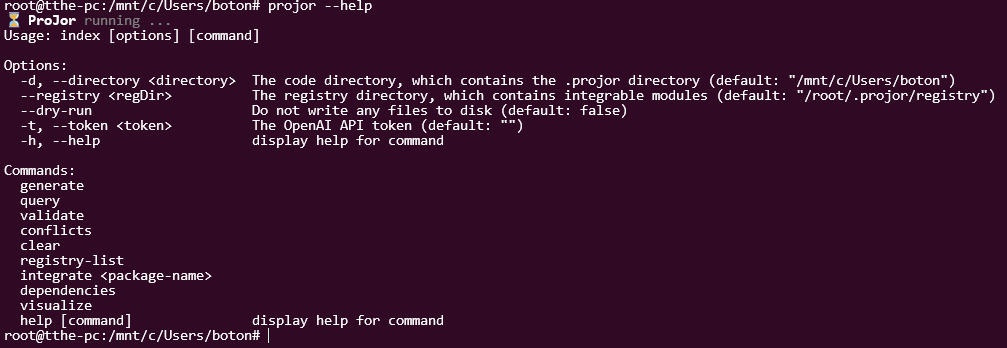
Once ProJor is installed, you can verify the installation by running projor --help in your terminal.
Working with ProJor
WARNING
Please note, that ProJor is currently in Alpha version.
The software may contain bugs, or unfinished / unnecessary features.
ProJor was designed to contain all artifacts related to your software in your own source code repository. A special directory called .projor/ is used to store these artifacts.
The file extension of these artifacts define how ProJor will interpret them. ProJor handles the following artifacts:
*.pschema.yamlor*.pschema.jsonfiles - You can define the schema of your software model in these files.*.pdata.yamlor*.pdata.jsonfiles - You can define the data collections of your software model in these files.*.ptemplate.mustachefiles - These are Mustache templates with a special frontmatter section. Source code files will be generated from these templates.*.pglobal.yamlor*.pglobal.jsonfiles - You can define global variables in these files, that can be used in your templates using the$special top-level variable.*.partial.mustachefiles - These are partial templates that can be included in other templates. The filename without the extension is used as the partial name.*.pquery.jsfiles - You can define queries in these files, that can be used to carry out model transformation.
You are supposed to check all of these files into your source code repository, so that your software model is versioned, traceable and reproduceable across your team.
First steps
Let's consider a very simple example next. We will create an NPM mono-repository, where packages are generated by ProJor.
In particular, we might have requirements along the lines of:
- Each package must have a
package.jsonfile. - For each package we might want to have a
.gitignorefile. - We might also want a
README.mdfile for each package.
See the steps below to bootstrap this example project.
Modelling the Package Schema
First, create a directory called .projor/ in the root of your repository. Inside this directory, create a file called Package.pschema.yaml with the following content:
id: Package
name: Package
description: A package in my NPM mono-repository
fields:
  - name: scripts
    description: The build scripts of the package
    type: dict
  - name: keywords
    description: The keywords of the package
    type: string
    multiple: true
Note, that we didn't have to specify a name or description field for the Package schema, as these are implicit for all objects in ProJor.
Creating a Data Collection of Package objects
Now, create a new file called packages.pdata.yaml in the .projor/ directory:
id: packages
name: Packages
description: The packages in my NPM mono-repository
schema: Package
objects:
  - name: api
    description: The API package
    scripts:
      build: 'echo Building API package'
    keywords:
      - api
      - ts
  - name: server
    description: The server package
    scripts:
      build: 'echo Building server package'
    keywords:
      - server
      - ts
Define templates for generating the package.json files
Next, create a new file called package.json.ptemplate.mustache in the .projor/ directory:
{
    "forEach": "packages",
    "filename": "packages/{{kebabCase name}}/package.json",
    "formatUsing": "json"
}
---
{
    "name": "@myapp/{{kebabCase name}}",
    "version": "1.0.0",
    "description": "{{description}}",
    {{#if keywords}}
    "keywords": [
        {{#each keywords}}"{{this}}"{{#unless @last}}, {{/unless}}{{/each}}
    ],
    {{/if}}
    "scripts": {
        {{#each scripts}}
        "{{key}}": "{{{value}}}"{{#unless @last}},{{/unless}}
        {{/each}}
    }
}
Generate the code
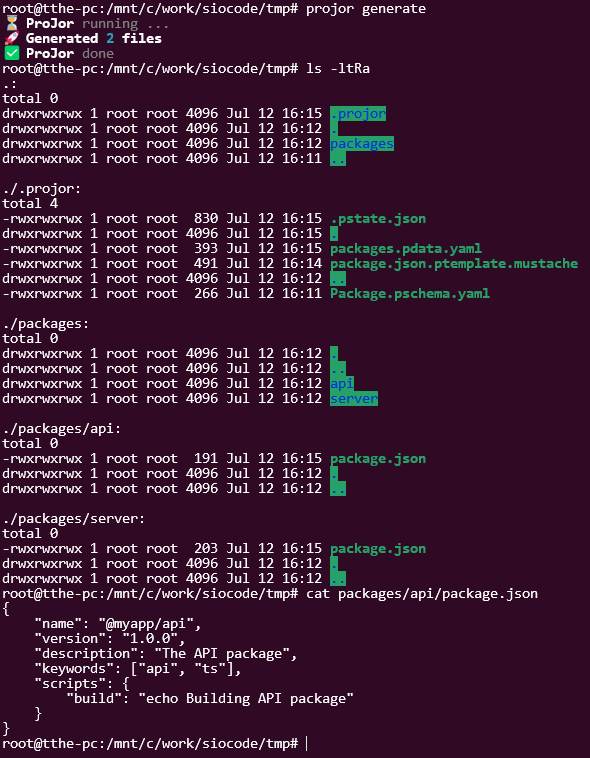
Now, we will generate the code.
- VS Code Extension - Press
Ctrl+Shift+P, and run theProjor: Generate codecommand. - CLI - Run
projor generatein your terminal.
If all went well, you should see a new packages/ directory in your repository, with two subdirectories: api/ and server/. Inside each of these directories, you should find a package.json file.
Creating a Global Variables file for storing the package versions
Now let's create the .projor/project.pglobal.yaml file with the following content:
scope: myapp
version: 1.0.0
Using the globalized version in the package.json template
Let's modify the package.json.ptemplate.mustache file to use the globalized version:
{
    "forEach": "packages",
    "filename": "packages/{{kebabCase name}}/package.json",
    "formatUsing": "json"
}
---
{
    "name": "@{{$.scope}}/{{kebabCase name}}",
    "version": "{{$.version}}",
    "description": "{{description}}",
    {{#if keywords}}
    "keywords": [
        {{#each keywords}}"{{this}}"{{#unless @last}}, {{/unless}}{{/each}}
    ],
    {{/if}}
    "scripts": {
        {{#each scripts}}
        "{{key}}": "{{{value}}}"{{#unless @last}},{{/unless}}
        {{/each}}
    }
}
Generate the code again
Now, we will generate the code again.
If all went well, nothing should change in the generated package.json files. However, you can now change the version or package scope in the .projor/project.pglobal.yaml file, and re-generate the code to see the changes in the generated package.json files.

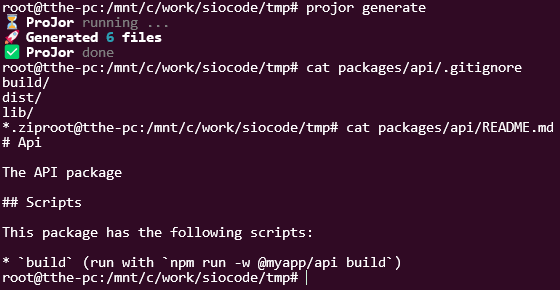
Define additional templates for .gitignore and README.md files
Let's create the .projor/gitignore.ptemplate.mustache file with the following content:
{
    "forEach": "packages",
    "filename": "packages/{{kebabCase name}}/.gitignore"
}
---
build/
dist/
lib/
*.zip
Let's also create the .projor/readme.md.ptemplate.mustache file with the following content:
{
    "forEach": "packages",
    "filename": "packages/{{kebabCase name}}/README.md"
}
---
# {{capitalCase name}}

{{{description}}}

## Scripts

This package has the following scripts:

{{#each scripts}}
* `{{key}}` (run with `npm run -w @{{../$.scope}}/{{kebabCase ../name}} {{key}}`)
{{/each}}
We can now generate the code again, to see the new files in the packages/ directory.
Define a template for the root package.json and README.md files
Now we'll use a different type of template, called the map template. This template will generate a single file, based on a part of the model.
Let's create the .projor/root-package.json.ptemplate.mustache file with the following content:
{
    "map": {
        "packages": "packages"
    },
    "filename": "package.json",
    "formatUsing": "json"
}
---
{
    "name": "@{{$.scope}}/root",
    "version": "{{$.version}}",
    "description": "Root package for my NPM mono-repository",
    "workspaces": [
        {{#each packages}}
        "packages/{{kebabCase name}}"{{#unless @last}},{{/unless}}
        {{/each}}
    ]
}
We will also create the .projor/root-readme.md.ptemplate.mustache file with the following content:
{
"map": {
"packages": "packages"
},
"filename": "README.md"
}
---
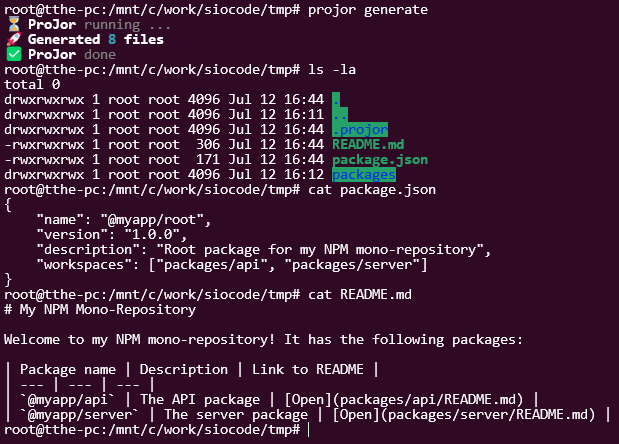
# My NPM Mono-Repository
Welcome to my NPM mono-repository! It has the following packages:
| Package name | Description | Link to README |
| --- | --- | --- |
{{#each packages}}
| `@{{../$.scope}}/{{kebabCase name}}` | {{{description}}} | [Open](packages/{{kebabCase name}}/README.md) |
{{/each}}We can now generate the code again, to see the new files in the root of the repository.
Going further ...
If you want to learn everything about ProJor, you can check out the Overview section of the documentation.
If you want to see more real-world-like examples, you can check out our Articles on ProJor.